
With Christmas fast approaching it seems like every day there is a holiday party and I’m asked to bring a dish. Of course you can’t go wrong with making a traditional pumpkin pie but with Florida strawberries in season I find myself leaning towards a new holiday tradition by making strawberry chiffon pie.
There’s no better way to receive praises from friends and family than to become a master of homemade pie crust. Even though we have the saying “easy as pie” the truth is that pie crust isn’t actually the easiest thing ever. To help get over your fears of the daunting word “homemade” I wanted to share a lesson in pie making from the best baker I know… my mom!
This is a recipe that she has been using forever! It’s not as sweet as the normal pie crust which actually is good to balance out the sweetness of the pie fillings. It can also be used in a savory dish like quiche.
Two things to remember when making pie dough… COLD and FAST!
Ingredients
- (This recipe makes two 9-inch rounds of dough)
- 3 cups flour
- 1 cup cold unsalted butter cut into small cubes (organic is best)
- 1 tablespoon white vinegar
- 1 whole egg (cold)
- 4 tablespoons cold water

*Measure out the flour into a food processor. If you do not have a food processor you can use a pastry cutter…. if you don’t have a pastry cutter you can use two knives…. if you don’t have two knives you and use your hands! People have been making pie forever so trust me, you can make it work.
*Add in the cold cubes of butter
*Process until crumbly. About pea size pieces are good. If you are using your hands make sure to work extra fast because your hands are warm and they will melt the butter.

*Combine vinegar, egg, and cold water.
*Add the wet ingredients to flour mixture whole food processor is running. If you are using your hands you can pour with one hand and stir with the other.
*Process only until dough forms a ball.

*Separate dough in half. Using plastic wrap, flatten into two disks.
*Refrigerate for at least 20 minutes… I recommend about an hour.

*Roll out to desired thickness… ours was about 1/4 inch.

*Make sure that you are rolling your dough out on a well floured surface.


*Wrap the dough around the floured rolling pin to make the transfer to the pie plate easier.

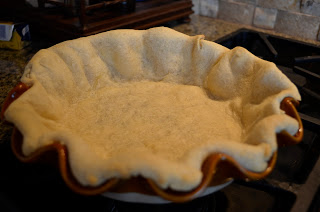
*Fold the overhang under and pinch together


*Then use your fingers to pinch the ends for the ripple design.

*I recommend putting the pie dough into the refrigerator for at least 15 minutes before baking.
*If you are blind baking make sure to cover the pie with aluminum foil and some sort of weight. Normally we use dried beans, but we didn’t have any around so we used pasta. It worked out fine!
*Bake at 375 degrees with the foil and weight on it for 7 minutes.
*Remove the weight and foil and bake for another 7 minutes or until slightly golden.
Blind baking ensures that your crust doesn’t get soggy. Not all recipes call for this so it may vary depending on your filling.


*The pie dish is from Williams-Sonoma you can also buy it at Macy’s.
*The dough was rolled out on a King Arthur Flour Silicone Rolling Mat
*A special thanks to my mom for being my hand model! Come back and visit my Pixie Posts again or stop by my blog Maria Provenzano.